Cleaning a kitchen faucet aerator Is a crucial task For maintaining A clean And efficient kitchen. The kitchen faucet aerator is A small but vital component, And knowing how To clean it properly is essential. In this guide, we’ll explore the steps To clean your kitchen faucet aerator effectively. By following these instructions, You can ensure that your kitchen faucet remains in pristine condition, Free from mineral buildup And grime, ensuring A clean And smooth water flow For all your culinary needs.
What Is A Faucet Aerator
Faucet aerators are indispensable tools that should be installed onto every faucet for improved control and improved water flow. Their main objective is to mix air into the flow, creating a steady stream while conserving water usage. It do this by injecting air into the flow which reduces splashing while saving both energy and money in terms of conserving both resources. They come in various shapes and sizes to fit with different faucet types for efficient water usage and increased functionality – perfect additions for any kitchen or bathroom sink for improving efficiency as well as overall functionality!
Why Does A Faucet Aerator Get Dirty Over Time?
An aerator accumulates dirt And debris over time For various reasons. One such factor Is minerals present in tap water. As it flows through, Calcium and magnesium tend To dissolve, leaving deposits On its fine mesh screen that deposit over time and lead To blockages. Particles And sediments from the supply may also get stuck inside. Eventually leading To reduced flow And pressure as A result of accumulation. Furthermore, Daily kitchen Or bathroom activities such As soap scum accumulation contribute To this accumulation As do daily kitchen Or bathroom activities that leave their mark resulting in accumulation.
Benefits Of A Clean Faucet Aerator
First and foremost, an efficient aerator ensures steady water flow by avoiding blockages from mineral deposits or debris that might otherwise clog it up, helping conserve water while saving utility bills. A clean it also contributes to improving water quality by decreasing chances of contamination from impurities that accumulate; additionally, a well-maintained one will minimize splashing, keeping your sink area dry while decreasing the frequency of cleaning needs and repairs or replacement needs. Furthermore, these measures prolong faucet’s lifespan, decreasing repair and replacement expenses over time.
Tools And Materials You’ll Need
- Adjustable Wrench
- Plastic Bag or Container
- Vinegar
- Toothbrush
- Soft Cloth
- Plumber’s Tape
Turn Off The Water Supply
Locate the shut-off valves under your sink – one for hot and one for cold – then turn each off clockwise until they click closed to stop water flow to your faucet and prevent any running water while disassembling and cleaning out its aerator. By doing this, any spillages from occurring during disassembly and cleaning process can be avoided while keeping you and others safe and ensure effective cleaning processes are undertaken safely and successfully. Once these steps have been taken safely and successfully, you can move on with maintaining your faucet aerator properly!
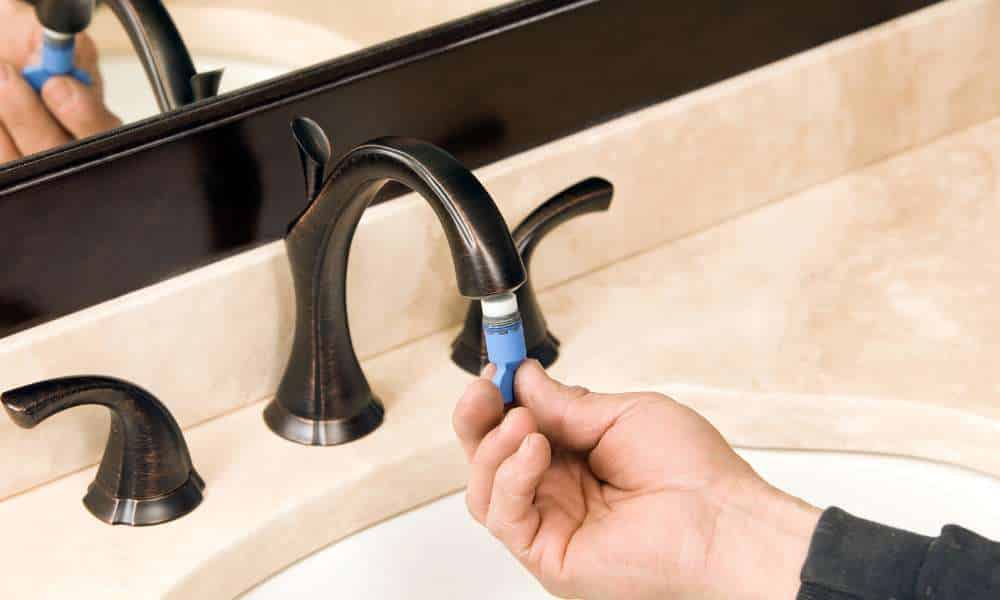
Remove The Aerator
Using an adjustable wrench, carefully grip the aerator’s exterior and turn it counterclockwise to loosen and unscrew it from the faucet’s spout. Be gentle but firm To avoid damaging the aerator Or the faucet itself. Once It’s sufficiently loose, You can often finish unscrewing it by hand. It’s important To handle the aerator with care, Ensuring not to lose any small components.
Learn how to clean your kitchen faucet effectively with simple steps and household items to keep it sparkling and bacteria-free.
Disassemble The Aerator
After you’ve removed the aerator from the faucet, Take a close look At its components. This typically consist of four main elements housing, Flow restrictor, screen, And washer. Carefully unassemble each Of these parts over A basin or container So as To capture any residual water Or small components that might fall out during disassembly. With each component now accessible For cleaning purposes you’ll be able To eliminate any debris, Mineral buildup, Or grime that has accumulated over time.
Soak In Vinegar
Vinegar’s mild acidity makes it an effective tool for breaking down mineral deposits and dissolving stubborn buildup on components of an system. Simply pour vinegar into a container or plastic bag and submerge all components fully for at least 30 minutes (depending on the severity of deposits) prior to cleaning them thoroughly. A vinegar bath will loosen and dissolve mineral accumulations and grime buildup so you can thoroughly clean all components more easily.
Scrub The Components
With a toothbrush, gently yet thoroughly scrub each part To remove any remaining dirt Or mineral deposits. Be especially vigilant with any fine mesh screens which tend To accumulate the most buildup. Be sure To clean all corners and crevices. Rinse each component under running water afterward so loose particles and vinegar residue can be washed away by running water. Scrubbing plays an integral part in restoring an aerator’s functionality by clearing away obstructions that impede its water flow; with just some effort your faucet will be freed of grime and be back into full performance mode!
Rinse And Reassemble
Assure all parts are free from debris, vinegar, or soap residue by running running water over them to rinse away any remaining dirt, vinegar, or soap deposits. Carefully inspect each component to make sure it’s completely unobstructed before reassembling your aerator by repositioning its flow restrictor, washer, and screen into their respective housing compartments – ensure they fit snugly – then attaching them back to your faucet and turning on the water supply.
Reattach The Aerator
Carefully secure the aerator back onto the faucet spout in a clockwise direction with your adjustable wrench, before tightening by hand to tighten further. Be mindful not to overtighten as overdoing it could damage either the aerator or faucet itself. Once secured, activate the water supply by opening shut-off valves underneath your sink and turn on water supply to check for leaks or irregularities in flow rates.
Turn On The Water
Once your aerator is securely back in place and free from leaks or issues, it’s time to reconnect the water supply. Head to the shut-off valves beneath your sink and turn them counterclockwise so the flow of water resumes. Turn on your faucet so water flows freely through your newly cleaned, Once restored you’ll immediately see its benefits as it flows more freely without obstructions and mineral buildup resulting from your efforts.
Conclusion
Over time, mineral deposits, debris, and grime accumulate within an aerator’s interior, restricting water flow. By following the steps outlined here – disassembling, soaking, scrubbing, and reassembling – your faucet aerator can be restored back to its pristine state, saving water usage costs while prolonging its lifespan and increasing utility bill savings. So with just some effort and the right tools you can enjoy having an efficient kitchen sink that flows cleanly for all of your culinary needs.